 |
ProofReader Studio User Guide |
| "User Guide" is a to fine word for this page. At this stage it is hardly more than a survival guide |
| The program is currently only a prototype, having a limited functionality. Also, I cannot give any warrenty that it is working flawlessly, but it did help me through my P3-Test without too many problems. |
| Spell-checking only supports danish (limited) and english (quite good). |
|
Getting started |
| After having started the program select: DP > Login, enter your username and password for "Distributed ProofReaders" (PGDP), and press Okay, and wait... |
| There is currently no indication of progress in communicating with the server of any kind. Whenever you perform a task that requires interaction with the server, you will simply have to wait until the interface becomes responsive again, or kill and restart the program when this fails (I told you this was only a prototype!). If the program should crash (become none-responsive for good) you better check whatever page you were working on to see what you have left behind on the PGDP server. How often does the program "crash"? Not very often but it can happen! If it happens, whatever you were doing was probably not completed, and no other harm was done. |
| Now (when the program is ready again) select: DP > Show projects... and select whatever stage you want to work in. I have done P2, P3 and F1 using the program. Let us say, you select P1. Then you wait for the P1-list to be downloaded. It will show a list of P1-project (no sorting implemented yet). Double-click on a project you want to work on, and wait (could be for some time). |
| Now you get a table of all the page, and the program will start to download and cache all the scanned images and OCR'ed texts. It will also create thumbnails showing a small image of the scanned page (it will stop this if you close the tab, and continue downloading if you open the project again). Blue pages are done (frozen), Green ones are available (fresh), Yellow ones are "temp", and White pages are "out". A grey border indicates that you are are the last user who has been working on the page (shown in the yellow and white pages below). The status/colors in the table is not updated unless you select: View > Update, or close the tab and open the project again. Please note there is a context menu on the images (mouse right-click). |
 |
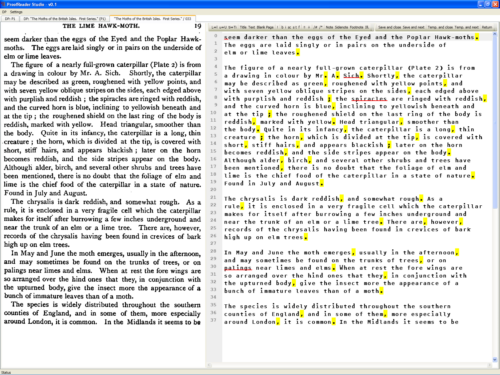
| Now select: Page > Proofread next page, and wait. You now get the scanned image on the left, and the text to proofread on the right. (it is a known error that nothing might show if the scanned image is very large (high resolution), but try resizing the window and it should work. If you experience this, please report it to me - I'm currently looking for a project that has this problem!). |
| You can move the image by dragging with the mouse and scale it using the mouse wheel (the center of scaling is the upper left corner of the image). |
 |
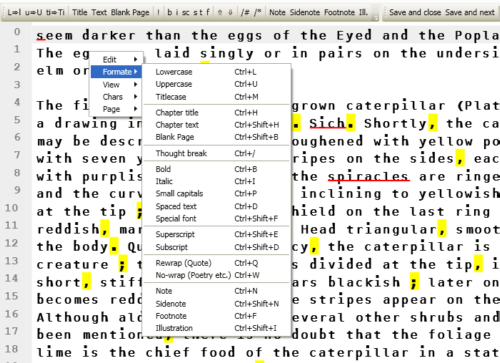
| The editor to the right has a context menu (right-click on the text), with quite a lot of options. Some of the markups operate on marked text also. |
 |
| The yellow markings highlight the punctuations, and are very important to parse the P3-Test. Spell-checking is dynamic (the language, if supported, is select automaticly), and misspelled words are underlined by red (or possibly the dictionary does not know the words). |
| This is not the only thing underlined with red, also things that the program finds suspisious are underlined. This could be all kinds of stuff (syntax etc.), but the most important thing about the red underlining is that it does not mean: "There is an error!", but: "Please check this!" |
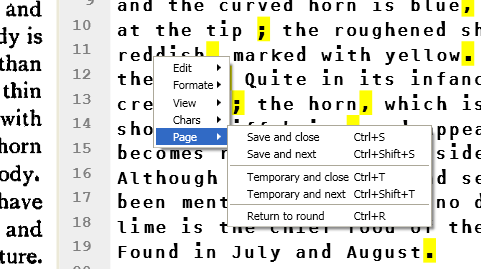 |
| "Save..." means sending the result back to the server, telling it you have finished proofreading the page. "Return page" is you lifesaver. You can play all you like in ProofReader Studio, as long you do not save or temp the page back to the server, and end by returning it. |
| Also note, that you can move the vertical center divider, and Ctrl++ and Ctrl+- changes the font size. You can use this to align the image and the text (more or less), making it easier to compare the two. |